
Like many others, I spent some time and money during the early days of COVID-19 quarantine redoing my desk setup, specifically using a DSLR to improve my webcam quality. I wrote an article about that almost 4 years ago, but I’ve since upgraded my equipment and setup to a point that it feels pretty dialed in now. Almost every time I get on a Zoom call with someone new, they ask me about my setup, so I figured it was due time to write an updated post to help others get set up in the same way.
Here’s the full view of my desk setup:
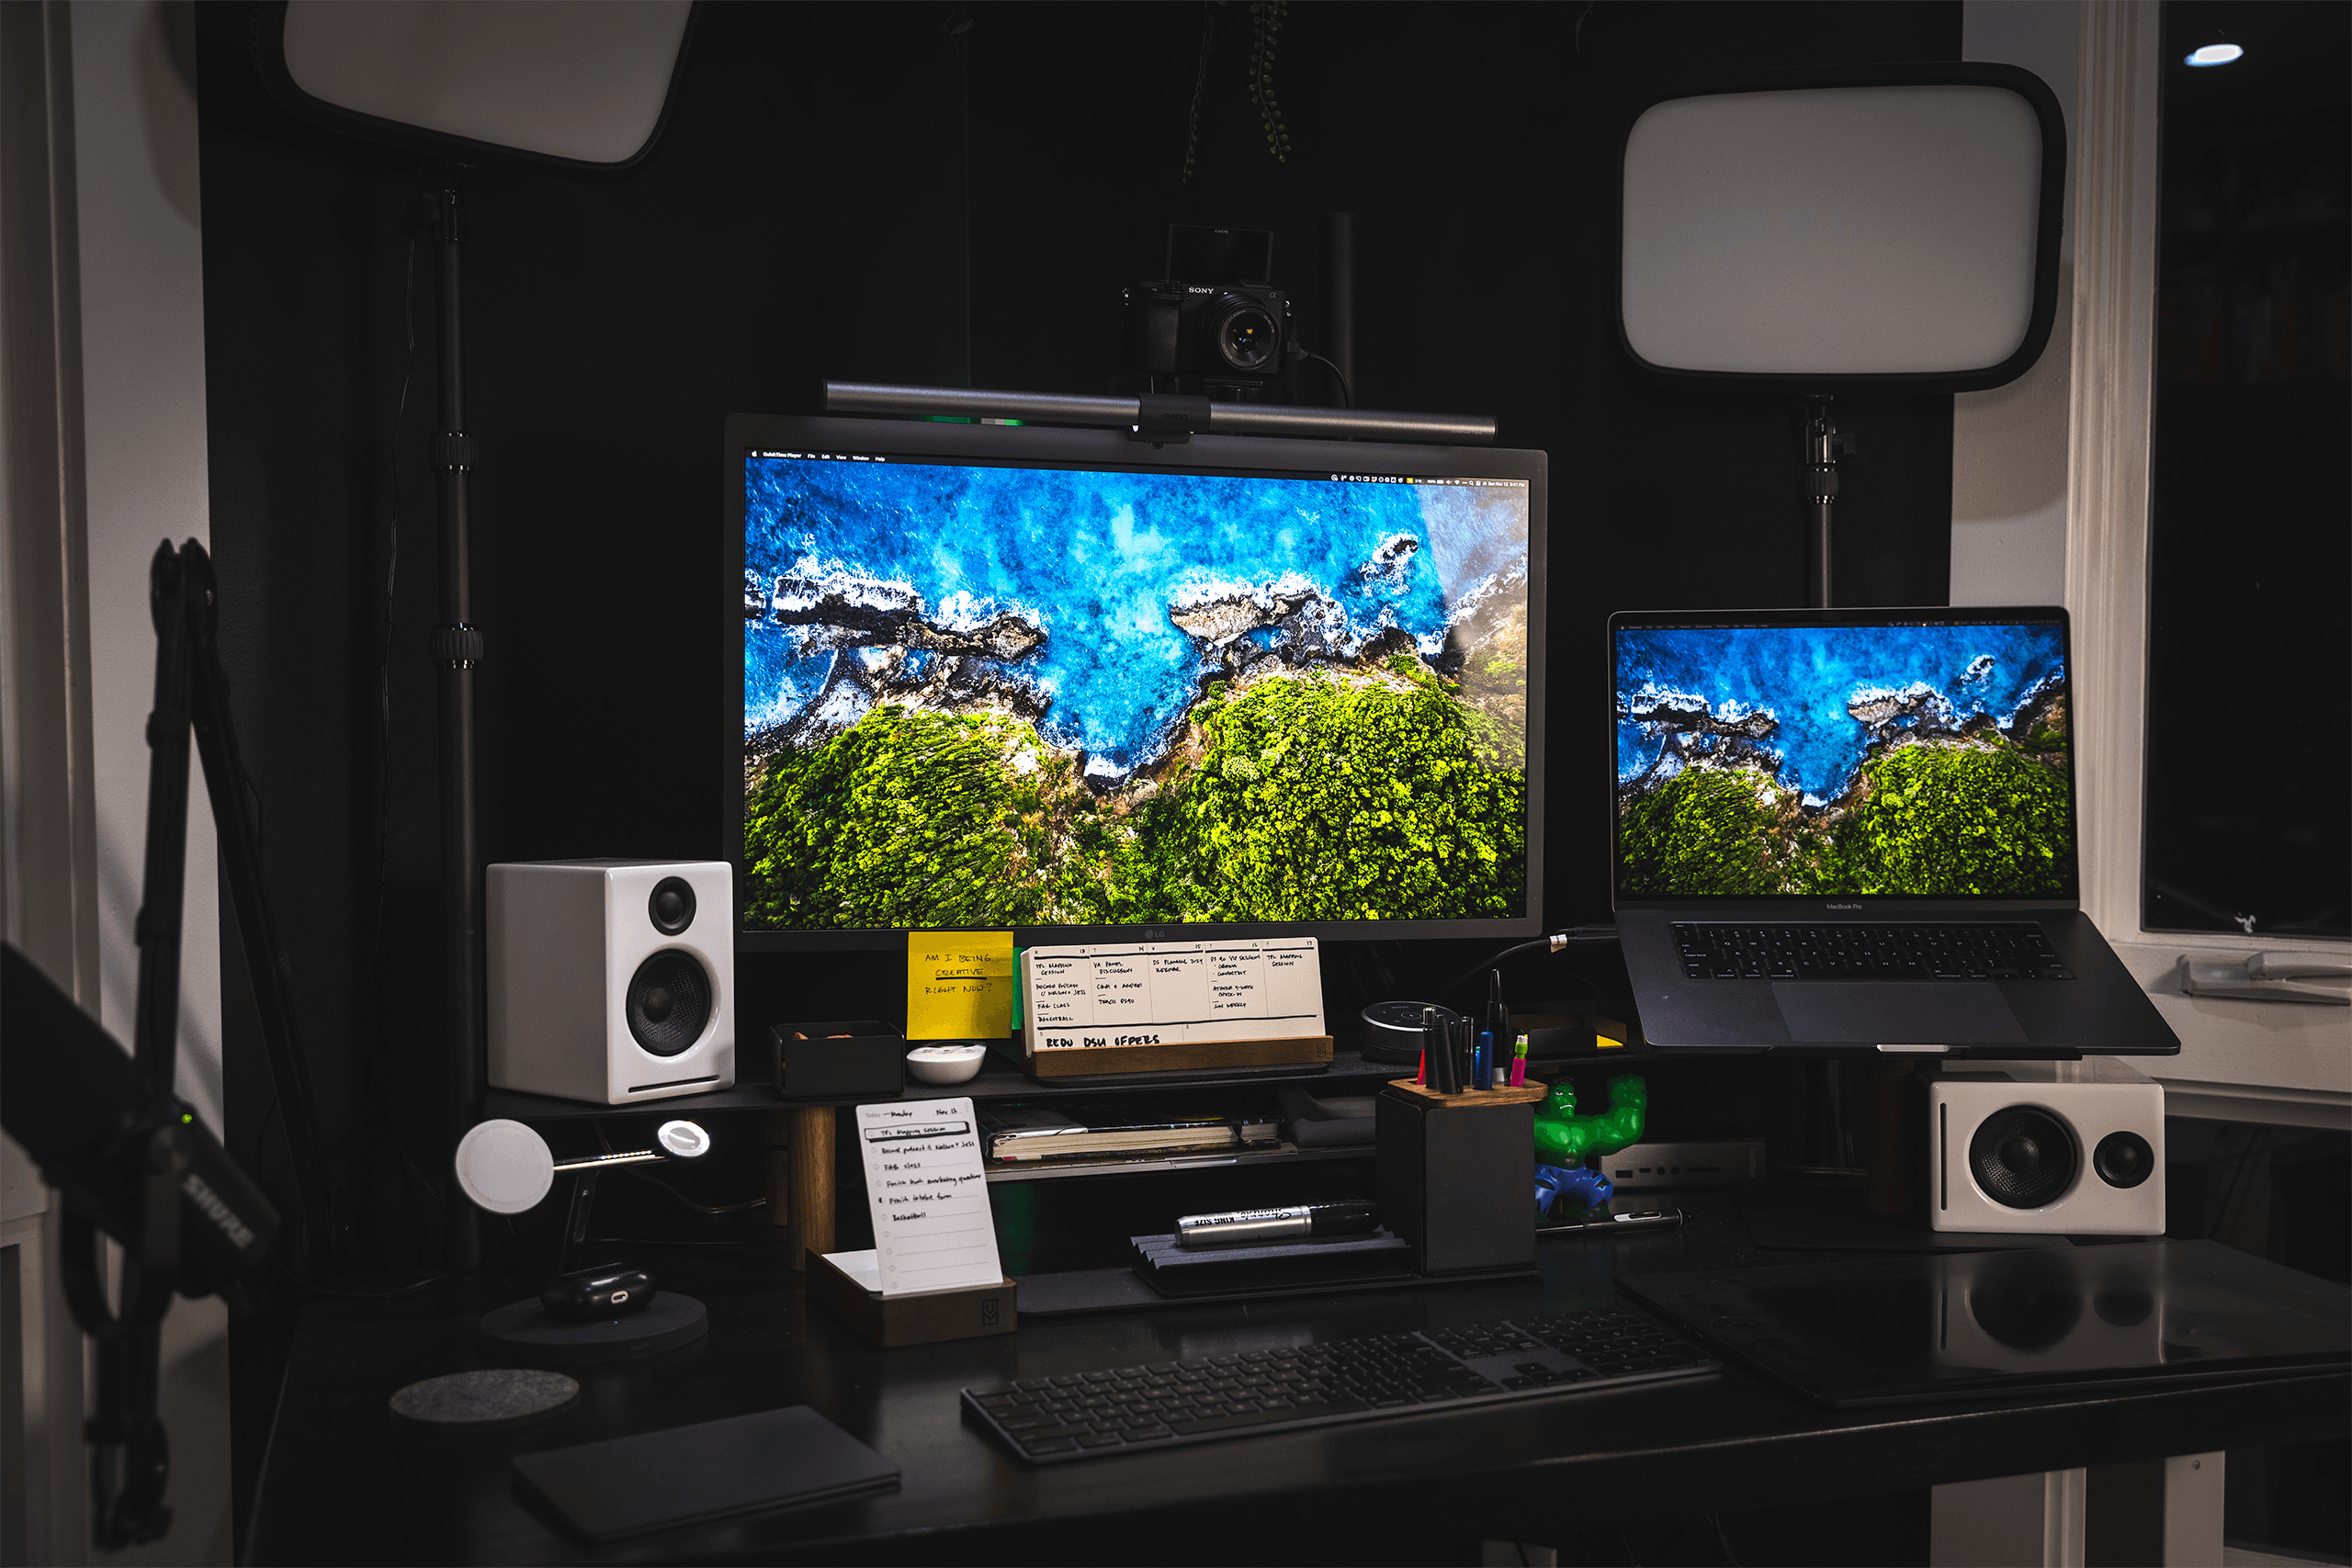
For those who just want the gear, here’s the list (affiliate links included):
Video, audio, and desk gear
Camera setup ($1,002.77)
Camera: Sony Alpha a6400 ($748)
Lens: Neewer 35mm f/1.1 ($72.79)
Stands & Mounts:
WALI Monitor Arm Mount ($27.99)
Pergear DSLR Camera Tripod Ball Head ($25.51)
Elgato Cam Link 4K ($99.99)
F1TP Power Supply and Dummy Battery ($19.50)
Lighting setup ($563.21)
Elgato Key Lights (2) ($179.99 each)
BenQ ScreenBar Halo ($161.10)
LED Corner Floor Lamp ($42.13)
Audio setup ($469.99)
Shure MV7 mic ($224)
Boom arm ($35.99)
Audioengine A2+ speakers ($210)
Desk & Accessories ($1,597.99)
Ugmonk Gather collection ($899)
Ugmonk Analog annual kit ($299)
Belkin MagSafe 3-in-1 Charging Stand ($119.99)
Custom built desk table top
Computer, monitor & peripherals ($4,896.90)
Apple MacBook Pro 16-inch ($2,499)
LG 27" 5K UHD UltraFine™ IPS Monitor ($1,299.99)
Apple Magic Trackpad ($149)
Wacom Intuos Pro - Large ($499.95)
CalDigit TS4 Thunderbolt 4 Dock ($319.96)
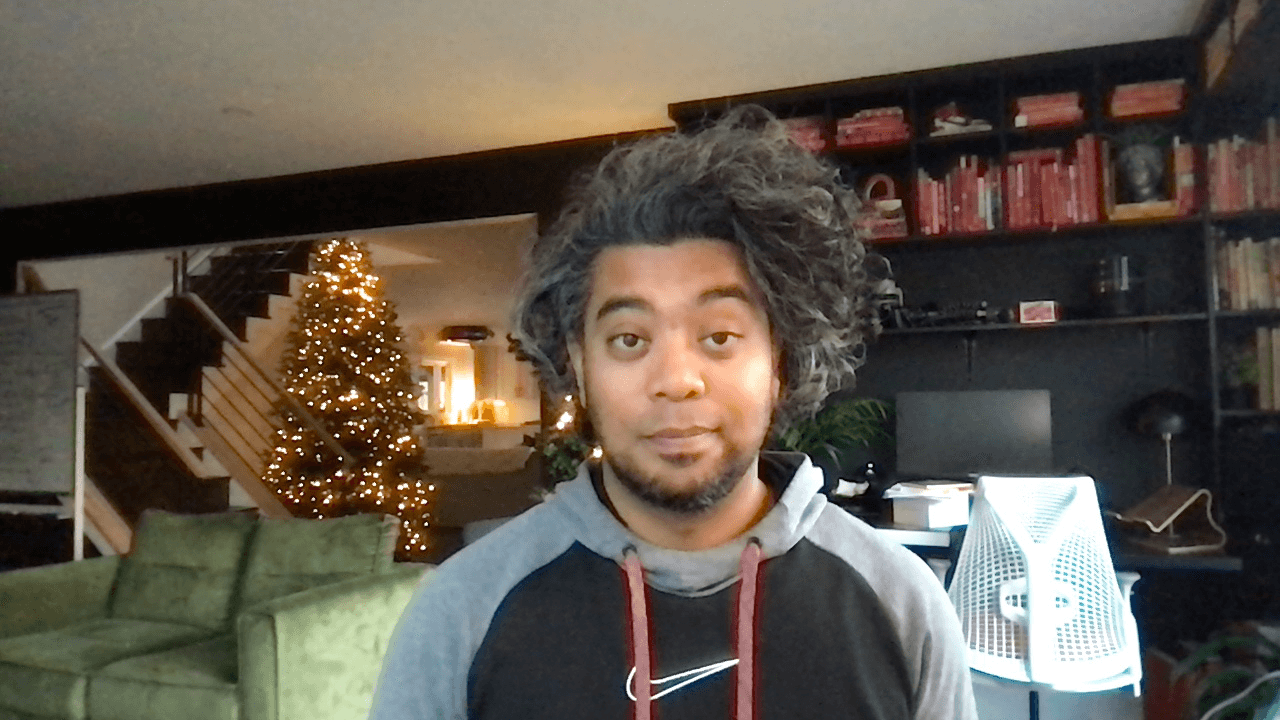
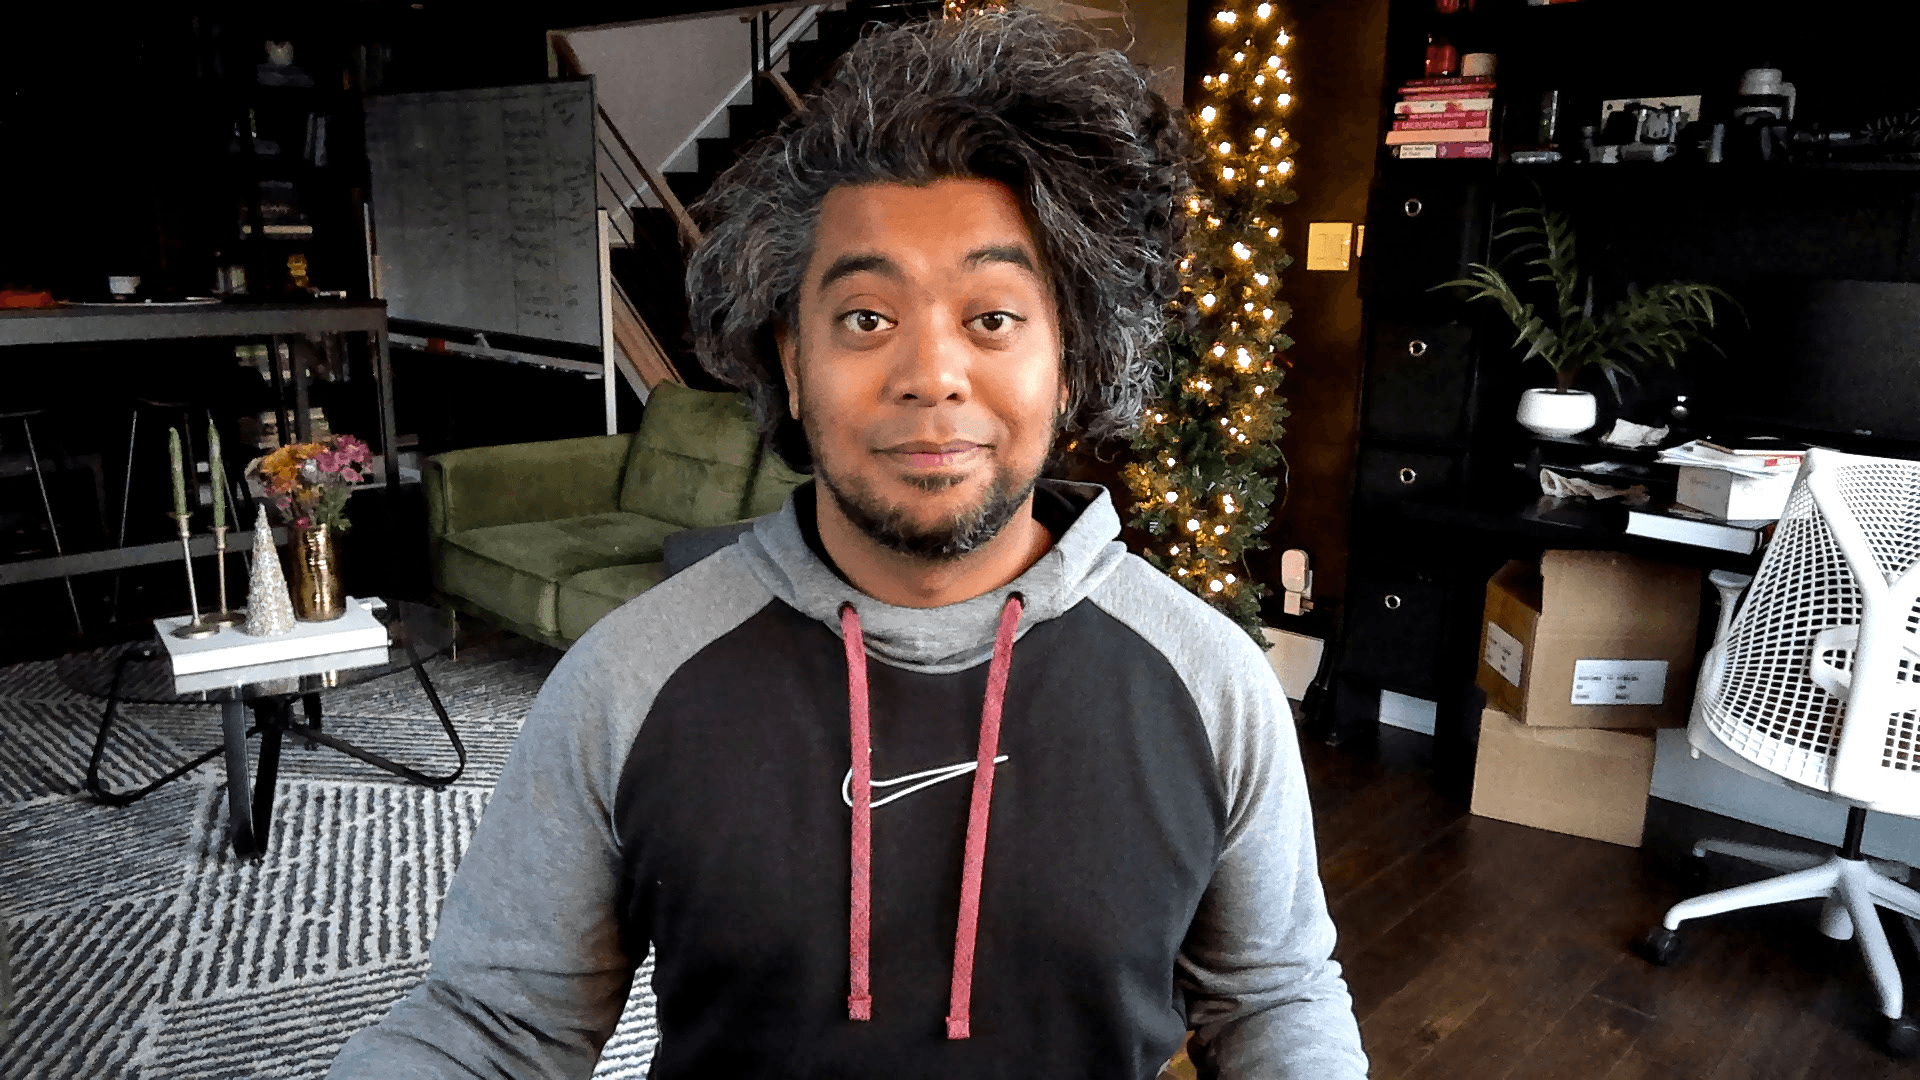
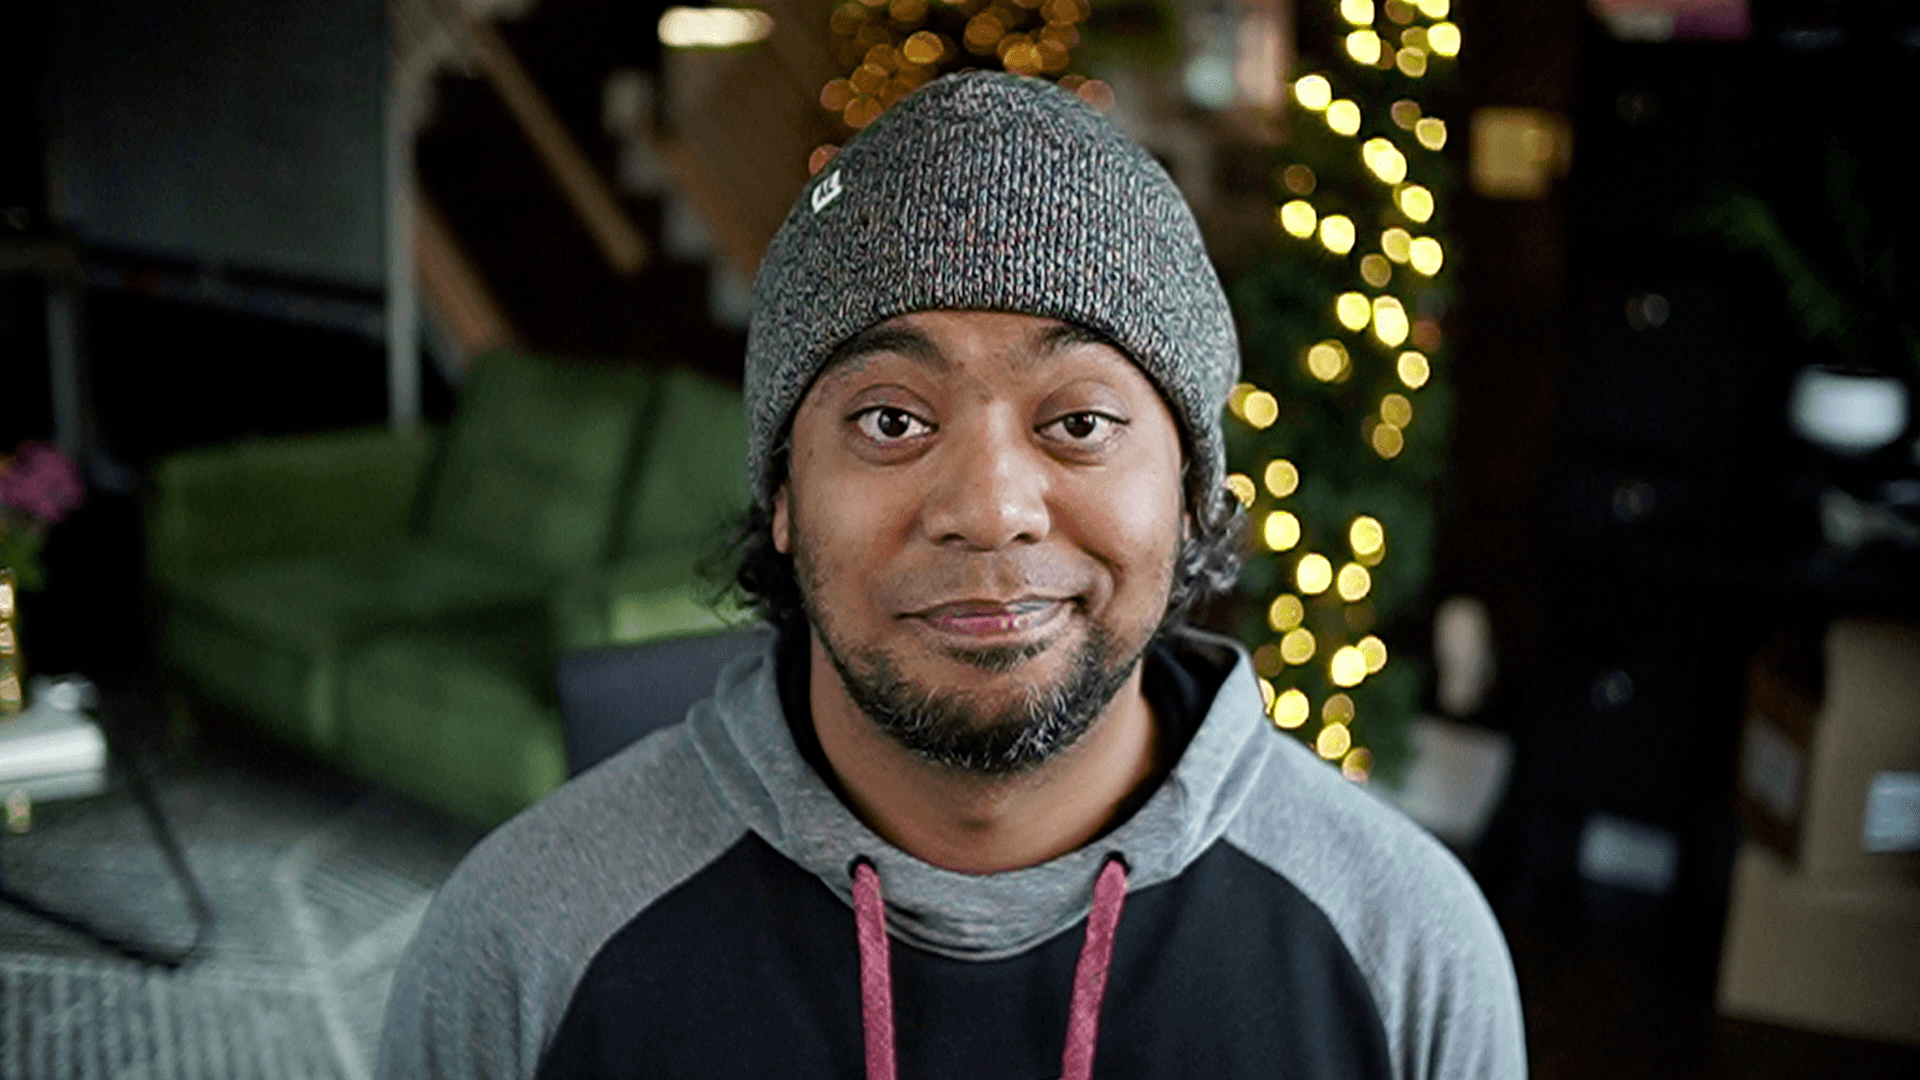
Here’s a comparison of how my video looks between my Macbook Pro webcam, my LG Ultrafine webcam, and my DSLR webcam.
From the MacBook Pro webcam:
From the LG UltraFine webcam:
From the DSLR webcam:

Some details around how and why I have this particular setup.
Balancing webcam easy setup + beautiful image quality
Overall, most of people want an the out-of-the box high-quality webcam. That’s typically a specialty product like the Lumina or Opal.
I tried early versions of both of these, and neither was great for me. The Opal got very hot and both were only slightly higher quality than my MacBook’s or monitor’s built-in webcam. Still though, if you want plug-and-play, these are both decent choices.
If you’re willing to do a little more work, you can set up a DSLR as your webcam, which is what I did. The biggest downsides to this approach:
It can be hundreds of dollars more expensive.
If you don’t know much about how cameras work, the combination of complicated camera menus, lens choices, and settings for each can be very intimidating.
The biggest reasons I felt comfortable going down this route is because 1) I know enough about cameras and lenses from shooting photos regularly and 2) I was willing to do research/spend some money to figure it out.
Camera choice
The general guideline for cameras is that you want to spend as little as you can on the body and as much as you can on the lens. The quality of the image comes mostly from a good lens, not a good camera. So, I wanted to find the cheapest full-frame camera I could find that shot 4k video. At the time, that was the Sony Alpha a6400. Currently, you can get it new for $748 or used for $649. Most times, you can even find a used one on eBay for less than that, which is what I did.
You’ll need a few things to go with this camera to make the setup work, and work well.
First, you’ll need a way to get the picture signal out of your camera and into your computer. Typically, that’s an HDMI signal, and not all computers accept HDMI. So, for the Sony alpha a6400, you’ll need a micro HDMI to HDMI cable plugged into something like the Elgato Cam Link 4K, which allows all of that to get to your computer via good old USB.
Next, I suggest getting a dummy battery. This tricks your camera into thinking there’s always a battery in it. Otherwise, you’ll be going through camera batteries every 30 minutes, and they also get super hot.
Regarding camera and desk mounting, I do everything that Caleb Pike suggests in his desk studio setup video:
Lens choice
Lens choice is the first important ingredient in getting great webcam image quality. For those that don’t know much about the technical details of cameras, getting that soft, buttery, out-of-focus background is what makes your setup look pro. To get that, you need a lens with a very wide aperture (also known as an “f-stop”). The lower the number, the better (and usually more expensive). For example, you can get a great f/1.2 lens (probably the widest aperture you’ll find), and you'll probably pay $2k or $3k for it. Don’t do that (unless you’re planning to shoot photos or video with it outside of it being your webcam). If you only want it to be your webcam, that kind of lens is overkill. Luckily, Amazon has their own brand of lenses called Neewer. They’re not good enough to shoot photos or videos with, but they’re perfect for a webcam setup. Buy this lens: Neewer 35mm f/1.1 for $72. This is what I’m using (an older version).
There are a few gotchas with this lens, but nothing unconquerable. It’s a manual focus lens only; not autofocus available. In my opinion, that’s a feature; I’ve tried other lenses and set the camera to autofocus. It looks great 80% of the time when it’s focused on me, but the other 20% of the time, it’ll try to focus on something in the background, especially if I’m moving. So, I prefer keeping the camera in manual focus mode, which is the only mode this particular lens allows for.
Here’s how I make sure I get the best image, including keeping me in focus.
Setting the aperture
First, I set the camera mode dial to “A,” which stands for “Aperture priority.” That means I set the aperture and the camera figures out all the other settings. The nice thing about this Neewer lens is that the apertures (or f-stops) are all on the lens. I turn the dial on the lens that’s closest to the camera to the widest aperture, which is f/1.1. That’ll get me the most out-of-focus background. (If you turn the dial the other way to f/22, you’ll see that the entire scene is in focus, which is the opposite of what we want).
Setting the focus using focus peaking
The next piece is making sure I’m properly in focus. To do that, I use the focus peaking option to help, a feature that shows anything in focus as bright red on the live view screen. Turn the focus ring on the lens until your eyes in particular are highlighted red to show that they’re in focus.
Lighting, room location & position
While camera and lens choices are important, they won’t mean much if you’re not lit well and/or in a good spot in your room.
The first rookie move most people make—myself included—is that they sit with a window behind them. This is the worst spot to be in! All the light is behind you and you’ll always be backlit, making you a silhouette in shadow. Instead, sit facing a window if you can so that all the natural light points at the most important part: your face!
If you can’t do that (and even if you can), you’ll also want to invest in some artificial lighting to make sure you’re always well lit when natural light is unavailable, like at night or on cloudy/stormy days.
I love the Elgato Key Lights. They’re lightweight, easy to set up, and I can control both the temperature and brightness through a menu bar app on my computer as well as an app on my phone. I’ve heard others really like the Lumecube Desk Lights, but I haven’t tried them myself.
The next tip is a hidden gem I picked up while watching a video of Peter McKinnon’s studio setup a few years ago. His studio is gorgeous, and he dropped this little nugget in the video:
Use the depth of the room diagonally… don’t use the shortest length of the room but the longest length of the room.
Genius! Set up so that the longest view of the room is directly behind you when the camera is pointing at you. That has two benefits:
It gives the viewer more interesting things to look at in the distance, even when it’s out of focus. There’s more visual interest there, and it keeps your viewer more focused on your screen.
To get that soft depth of field, things behind you need to be varying distances away from you. In my frame, I have a sofa 6 feet behind me, a Christmas tree 8 feet away, stairs 15 feet away, and my kitchen way back in the distance. My head and torso is usually covering some of that, but when I move around, the viewer gets a glimpse of that distance, which remains intriguing. Here’s the view when I’m wearing a hat so you can see a little more of what’s back there:
For more office and studio setup tips specifically for camera framing, I love the stuff that Kevin Shen shares.
I hope that helps you if you want to improve your webcam quality!
Further reading
Video Conferencing with a Proper Camera, by Aaron Shekey
The Fancy DSLR Webcam Thing, by Chris Coyier
read this next
A full line doesn’t always mean the right line.


